Need OEM supplier support for this product type?
Contact KOLARWIN Tools for OEM mechanic tools, private label packaging, wholesale quotation and product range support. This gives overseas buyers a clear path from article reading to supplier discussion.
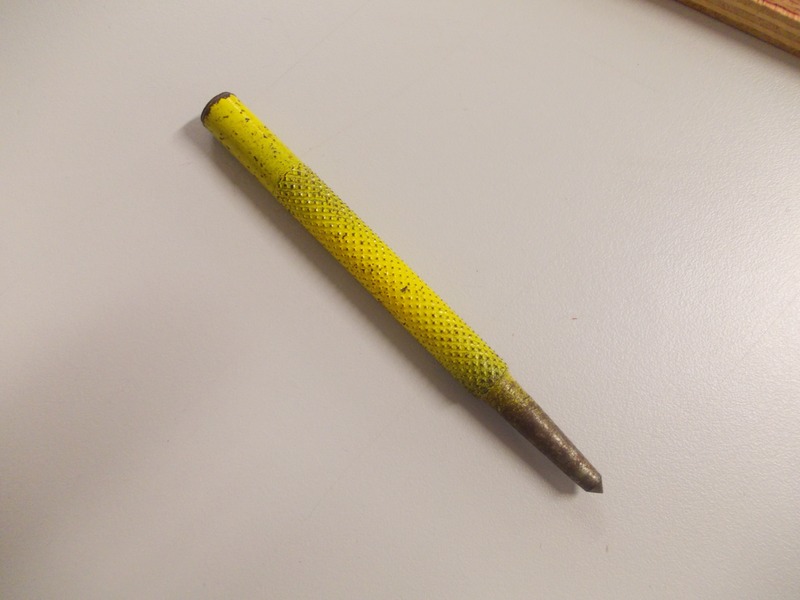
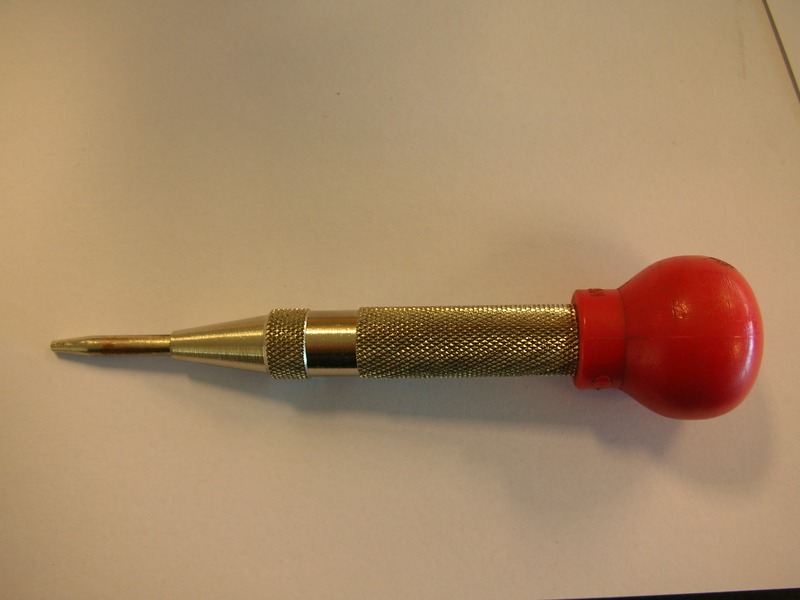
A center punch marks a drill location with a small dimple; a drill makes the hole. Manual punches use a hammer, while automatic spring models create an impact when pressed. Trigger and adjustment details vary by model. Choose by material, tip, access, and intended mark.
1. What is a center punch used for?
On suitable material, a center punch displaces a small amount of surface and leaves a drill-start dimple. That mark is not a bore or finished feature. Starrett describes marking a planned hole center. Larger drills may need a separate pilot hole when drill web exceeds dimple.
Mark first, drill separately. A punch sets location; drilling cuts afterward. A punch cannot fix a layout error or unstable workholding.
Sequence:
- Locate intended point from a drawing or measured datum.
- Confirm the work surface can accept a small indentation.
- Place punch point over the mark and create a visible dimple.
- Recheck location before drilling; correct an error before cutting.
Make a mark suited to the planned bit and material; it will not correct runout or poor tooling.
Purpose and boundary table
| Tool action | What it does | What it does not do | Next step |
|---|---|---|---|
| Center punch | Marks a drill start with a dimple | Cut or drill a hole | Select drill and fixture |
| Drill | Removes material to form a hole | Set the original layout location | Follow the drawing and process |
| Layout mark | Identifies a target location | Guarantee a centered drill start | Verify before punching |
| Pilot hole | Creates a smaller preliminary bore | Replace all punch/layout steps | Use only when process calls for it |
Practical action: describe the punch’s job as “marking a drill start,” not drilling or hole making.
2. How does a center punch differ from other punches?
Punch families have distinct jobs. A center punch leaves a location dimple; a prick punch makes a finer layout mark. A pin punch drives or removes a loosened pin. A leather punch cuts a round opening. Starrett catalogs these as separate functions.
Name the operation before ordering. Pair tool type with task: mark, drive pin, transfer layout, or cut a hole. A leather hole punch guide covers cutting; a specialty pliers guide covers related eyelet tools.
Check:
- Intended operation and work material.
- Tip shape and diameter listed for the exact model.
- Whether the tool is struck, pressed, or used with a separate hammer.
- Whether the punch creates a mark, drives a component, or removes material.
Choose by end geometry and operating method, not appearance.
Punch function table
| Tool type | Primary job | Typical action | Do not substitute for |
|---|---|---|---|
| Center punch | Dimple a drill location | Strike or spring-actuate | Drill or hole cutter |
| Prick punch | Fine layout mark | Hammer strike | Pin-driving punch |
| Pin punch | Move a loosened pin | Hammer strike against pin | Drill-location marker |
| Leather hole punch | Cut a round hole | Squeeze or strike, by model | Metal center punch |
Practical action: require the task name and punch type in item descriptions and set labels.
3. Should I use a hammer-driven or automatic spring punch?
A manual punch is hand-positioned and struck with a hammer. An automatic model uses a spring mechanism to produce an impact under pressure; this can help in confined spaces. Starrett and RENNSTEIG describe spring-triggered models, but force and adjustment vary.
Choose by access and process. Automatic models remove the separate hammer step, but still need stable positioning and suitable material. Not every model has adjustable force or the same point geometry.
Review:
- Manual or automatic operating method.
- Required hammer type for manual models, if the manufacturer specifies one.
- Spring force adjustment or fixed setting, as stated for the model.
- Tip replacement availability and compatible spare part number.
For hammer selection, see ball-peen versus dead-blow hammers. Follow punch instructions for the specified hammer and strike.
Operating type table
| Format | How impact is produced | Buyer check | Limitation |
|---|---|---|---|
| Manual center punch | Separate hammer strike | Punch size, hammer instruction, work access | Requires coordinated hand positioning |
| Automatic spring punch | Internal spring mechanism | Model’s trigger and force adjustment | Features vary by model |
| Adjustable automatic | Spring setting changes by model | Marking needs and material instructions | Do not infer universal force settings |
| Spare tip | Replaceable punch point on some models | Exact part compatibility | Replacement does not change tool rating |
Practical action: compare manual and automatic samples on the intended material before choosing a production standard.
4. How do I place a center punch accurately?
Locate the target from a drawing, template, or approved datum. Check part orientation, place tip on intended center, and mark as instructed. If the dimple sits off target, recheck layout before drilling.
Make the reference visible before impact. A punch cannot correct a bad measurement. Use an approved drawing or fixture datum, and avoid repeated blows that widen a dimple without improving location.
For repeat work:
- A layout line or center mark visible against the material.
- A fixture that keeps the part from moving.
- Clear access for point placement without leaning over work.
- A second check against the drawing before drilling.
Starrett’s product page emphasizes accurately centered tips. Point geometry and condition also affect a model’s mark, so nominal diameter alone does not define accuracy.
Location check table
| Layout condition | Check before punching | After the mark |
|---|---|---|
| Single hole from an edge | Datum and edge distance | Confirm center against drawing |
| Hole pattern | Pattern origin and spacing | Verify each point before drilling |
| Repair location | Actual assembly reference | Recheck surrounding clearance |
| Fixture-based work | Part seating and clamp stability | Confirm punch landed on target |
Practical action: mark from a verified datum; inspect the dimple before drilling.
5. How should I prepare and support the workpiece?
Support the work against sliding or tipping. A vise or fixture can stabilize small parts. Keep fingers clear of the striking path and wear eye protection, as Starrett advises.
Secure the part, not your hand. Thin or unsupported stock may flex or shift. Do not punch glass, brittle items, or finished surfaces without a process and tool approved for that material.
Check before marking:
- Material and hardness are within the exact punch model’s stated application.
- Workpiece is secured against movement and supported near the mark.
- The surface can accept a permanent dimple.
- Working tip is not chipped, flattened, or contaminated.
- Manual punch struck head has no mushrooming, cracks, or loose material.
For broader shop-tool planning, see the complete mechanic tools list and auto mechanic tool checklist.
Workpiece preparation table
| Work condition | Setup check | Avoid |
|---|---|---|
| Small metal part | Clamp securely near work point | Holding part in fingers |
| Thin sheet | Add proper backing or fixture | Unsupported striking that bends sheet |
| Finished or soft surface | Confirm approved contact or protective process | Assuming punch leaves no visible mark |
| Glass or brittle part | Use only a specifically approved tool/process | General steel center punch |
Practical action: secure the workpiece and confirm material suitability before striking or spring-actuating.
6. How do I use a manual hammer-driven center punch?
Set the punch on a verified mark and use a manufacturer-specified hammer. Strike in a controlled manner, then inspect location and depth before another blow. Do not apply a universal strike count or force; material and model affect results.
Start controlled and inspect. Starrett describes centered, ground tips; RENNSTEIG states material limits for individual models. Check the offered model’s data sheet.
During use:
- Keep punch aligned on intended mark.
- Strike striking face, not punch side.
- Keep supporting hand outside hammer path.
- Recheck the dimple before drilling.
If the point skates, inspect surface, tool condition, location, and support before increasing force. The homeowner hand-tools guide gives broader kit context.
Manual punch sequence table
| Action | Check | Stop if |
|---|---|---|
| Position point | Tip rests on verified mark | Tip moves off layout |
| Support work | Part and fixture remain stable | Part shifts or flexes |
| Strike as instructed | Hammer contacts striking face | Punch bends or tip chips |
| Inspect dimple | Location is visible and usable | Mark is misplaced or surface cracks |
Practical action: check punch and workpiece after each mark before committing to drilling.
7. How do I use an automatic spring center punch?
Place the tip on a verified mark and press per its instructions. Some designs trigger under downward pressure; others offer force adjustment. RENNSTEIG lists model-specific force ranges; Starrett’s 18AA model has an adjustable cap. These are examples, not universal values.
Press to the model’s cue. Keep the tip from sliding. If a mark is too shallow or strong, inspect it and consult adjustment instructions before repeating. Automatic models still impact the work.
Use this process:
- Confirm tip and force setting for intended material.
- Place point at layout mark and steady body.
- Press according to the manual until its mechanism actuates.
- Inspect the mark before adjusting or repeating.
RENNSTEIG describes a spring mechanism activated by downward pressure; Starrett describes adjustable force on one model. Confirm features for the offered part number.
Automatic punch review table
| Feature | Confirm on product data | Operating check |
|---|---|---|
| Trigger method | Pressure-actuated or other specified design | Follow model instructions |
| Force setting | Fixed or adjustable as documented | Use intended setting only |
| Point | Tip size and replacement part | Check for damage before use |
| Reset | Model-specific mechanism | Confirm punch resets before next mark |
Practical action: record the tested setting and model number for repeat production marks.
8. Which materials and jobs are unsuitable for a center punch?
A center punch marks; it does not drive pins, align holes, cut openings, or break parts free. Use a pin or alignment tool for those jobs. Avoid glass and brittle materials unless the exact tool and documented process approve them. Always follow model-level material limits.
Stay within documented use. Tip angle, hardness range, force, and material limits vary. Consult the official model data. Stop if surfaces chip, crack, or deform; a dimple is permanent.
Choose another tool or process to:
- Cut a round hole with a leather hole punch.
- Drive or remove a pin with a proper pin punch.
- Align existing holes with a fixture or alignment tool.
- Mark glass or brittle material only with an approved tool and procedure.
A leather hole punch cuts holes; it does not mark a drill start.
Use boundary table
| Job | Center punch fit | Better direction |
|---|---|---|
| Mark drill location on approved material | Yes, with suitable model | Confirm point and workholding |
| Cut leather hole | No | Leather hole punch |
| Drive or remove pin | No | Correct pin punch |
| Align existing holes | Not its stated job | Alignment tool or fixture |
| Mark glass or brittle material | Only with specific approval | Material-specific process |
Practical action: check the manufacturer’s stated material and application before adding a center punch to a process.
9. How should buyers inspect points and manage a center-punch set?
Check the working tip for chips, flattening, rust, or contamination. Inspect a manual punch’s struck head for mushrooming or cracks. Remove a damaged tool from service and follow maker repair instructions; OSHA’s construction rule also bars use of mushroomed impact-tool heads. Automatic models also need a working mechanism. Replace parts only as allowed for that model.
Tie spares to the model. Identify each point and operation type. Keep manual center punches apart from pin punches and hole cutters. See the mechanic tools list for broader assortment context. For home-repair retail, see 14 hand tools for home repairs.
Review before releasing a set:
- Point sizes and exact included models.
- Manual versus automatic operating method.
- Replacement point or spring references, if supplied.
- Packaging labels, safety instructions, and inspection criteria.
List each model and stated material application; avoid claiming universal coverage.
Set inspection table
| Set field | Buyer check | Record |
|---|---|---|
| Tool type | Center, automatic, pin, or other | Model name for each piece |
| Tip | Diameter, condition, replacement status | Part number and spare availability |
| Operation | Manual or spring-actuated | Instruction version |
| Package | Contents and protective storage | Approved BOM and label proof |
Practical action: verify each set component against its model data before approving the carton contents.
10. What should a center-punch sourcing RFQ include?
An RFQ should identify operation and material. State manual or automatic type, tip, dimensions, work material, and application. For automatic tools, request trigger method and documented force setting; for manual models, specify striking method. Do not invent universal angle or load requirements.
Request model-specific evidence. Include quantity, market, packaging, spare tips, and instructions. For sets, list each model and replacement part. Ask for manufacturer material limits; do not invent hardness values.
Include:
- Center punch type: manual or automatic.
- Tip diameter, overall dimensions, and material application.
- Force adjustment or point replacement details, if applicable.
- Quantity, market, packaging, spares, and required documents.
- Reference sample or drawing when mark size or location matters.
Send the specification and sample with a KOLARWIN quotation request. Ask the supplier to flag mismatches before sample or package approval.
Q1: What is a center punch used for?
It makes a small dimple that marks a location and helps a drill start without wandering.
Q2: Does a center punch make a hole?
A center punch marks a surface; a drill or cutter makes a hole.
Q3: What is the difference between manual and automatic center punches?
A manual punch uses a separate hammer. An automatic model creates an impact through its internal mechanism when operated as instructed.
Q4: Can a center punch be used on glass?
Do not use a general steel center punch on glass. Use only a specifically approved material and tool procedure.
Q5: Is a center punch the same as a pin punch?
Those tools serve different tasks. A center punch marks a drill location; a pin punch drives or removes a pin.
Looking for a reliable mechanic tools manufacturer in China?
If you are sourcing hand tools, socket tools, automotive repair tools, mechanic tool sets or OEM private label tools, contact KOLARWIN Tools for factory-direct quotation, customization support and product consultation.