Need OEM supplier support for this product type?
Contact KOLARWIN Tools for OEM mechanic tools, private label packaging, wholesale quotation and product range support. This gives overseas buyers a clear path from article reading to supplier discussion.
A punch that fits one strap may fail on a lined panel or thicker hide. Match hole, material, access, and workload. Tube sizes vary by model, so verify samples and specifications. This guide gives importers an RFQ checklist.
1. What job must the punch perform?
Start with the finished product. A round punch makes an opening in soft sheet material; an eyelet or grommet setter deforms a fitting through a prepared hole. Some kits bundle both tools, but punching and setting use different working ends. List each task before choosing an assortment.
A distributor may need small strap openings, larger hardware holes, or repair tools for a workshop counter. These uses may require different diameters and material limits. Record whether operators punch single layers, folds, lined goods, or stacks. Note station changes and portability needs.
Start with the receiving part. Gather its drawing, a physical sample, and hardware dimensions. A supplier can assess a more useful request when each hole has an application and acceptance criterion.
- Name each product and hole location.
- Record order volume and expected holes per shift.
- Separate hole punching from setting eyelets, snaps, or rivets.
- Identify hand-held, bench, repair, or production use.
Buyer inputs to define before tool selection
| Buyer input | Why it affects selection |
|---|---|
| Finished part and hole function | Sets shape, location, and mating-hardware needs |
| Material layers and thickness | Helps define sample conditions and tool limits |
| Hole quantity and frequency | Guides manual tool versus production method |
| Work location and access | Determines reach, portability, and handling |
For a broader tool overview, see the specialty pliers buying guide.
2. Should you choose revolving pliers or a drive punch?
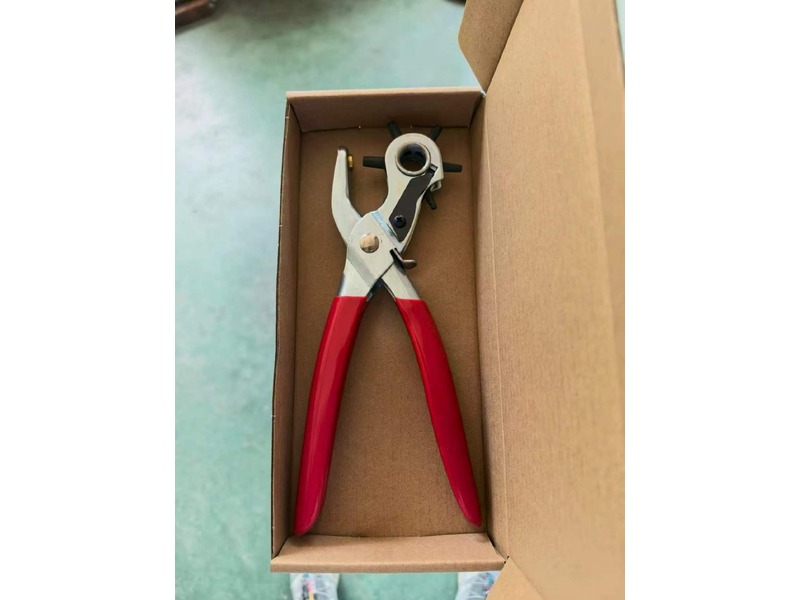
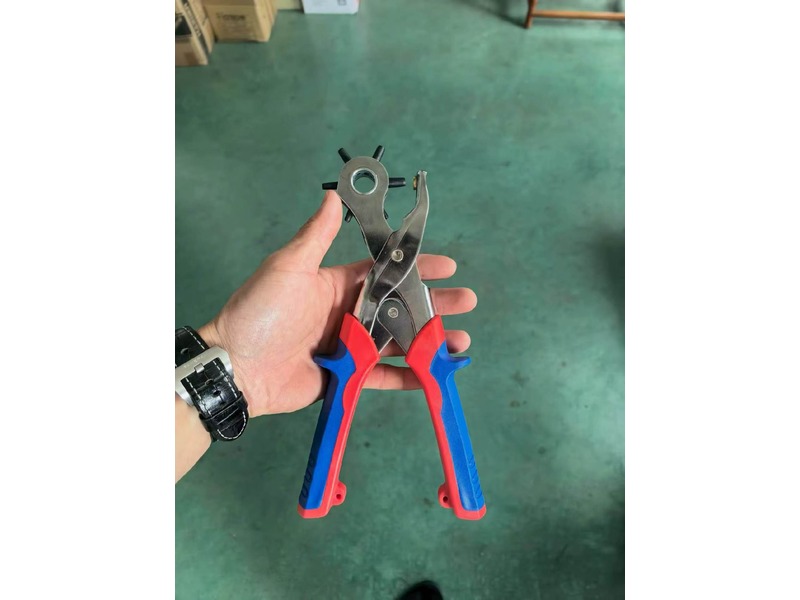
A revolving punch plier carries several hollow tubes on a rotating head. An operator indexes one tube over an opposing anvil, then squeezes both handles. A drive punch uses one tube at a time and receives force from a mallet. Both can make round holes, yet their setup and working reach differ.
Revolving pliers suit buyers who value a compact tool with multiple tube positions. They avoid a separate striking tool and make size changes quick. A drive punch can offer a different balance for bench work, larger holes, or material outside a particular plier model’s instructions. It also requires a suitable striking surface and controlled alignment. Neither mechanism deserves a blanket thickness claim; check the exact model and test real material.
Choose by work pattern, then validate the cut. Test both styles on identical samples for repair and production use.
- Select revolving pliers for portable, occasional work with several required sizes.
- Evaluate drive punches where a dedicated tube or bench process fits better.
- Confirm tool reach and material compatibility before approving either style.
Mechanism comparison
| Decision factor | Revolving punch pliers | Drive punch |
|---|---|---|
| Size changes | Rotate among fitted tubes | Change individual punches |
| Force method | Hand squeeze | Mallet strike |
| Work setup | Self-contained hand tool | Requires stable support surface |
| Main check | Indexing and anvil alignment | Tube condition and striking setup |
For related selection context, buyers may also compare automatic and manual wire strippers; the mechanisms differ, but both decisions depend on the real work cycle and material.
3. How should you specify hole diameter?
Specify finished hole diameter from the mating part or drawing. Do not choose a punch by estimating from a photograph or assuming that every revolving model carries the same six sizes. Sizes vary by model. KNIPEX lists 2.0, 2.5, 3.0, 3.5, 4.0, and 5.0 mm. Maun lists 2.0, 2.4, 2.8, 3.2, 4.0, and 4.8 mm on another model. Neither sequence is a market standard.
For buckle holes, check fit against actual hardware. For eyelets, follow maker instructions; setter dies and eyelet dimensions differ from punch tube sizing. Clarify whether listed punch dimensions mean nominal tube diameter and how sample holes are measured.
Write each diameter down in the RFQ. Include units and tolerance only when your drawing or process defines them. Ask the supplier to identify available sizes by model and provide replacement options where offered.
- State each required hole diameter in millimetres or inches.
- Match holes to the actual buckle, fastener, or fitting.
- Ask for a model-specific tube-size list.
- Measure punched samples with a suitable gauge.
Diameter verification checklist
| Verification item | Buyer action |
|---|---|
| Required diameter | Give drawing value and unit |
| Mating hardware | Provide sample or maker’s fit instruction |
| Offered punch sizes | Request exact model list |
| Sample result | Measure and record actual opening |
4. How do leather type and thickness affect selection?
Leather varies in thickness, temper, finish, construction, and number of layers. A thin, soft strap may behave differently from dense vegetable-tanned leather or a lined assembly. Coatings and backing can also affect how a cut edge looks. Buyers should therefore provide representative material rather than treating “leather” as one universal test condition.
Manufacturer instructions can set a model’s intended material range. Maun describes its standard model for soft materials. Its separate heavy-duty model is identified for leather greater than 1.5 mm. That statement applies to Maun products only. KNIPEX identifies leather, textiles, and plastic for its model but gives no universal thickness figure.
Let samples set the limit. Test thinnest and thickest expected material, including common layered construction. Check for complete cuts, excessive force, crushing, or torn exit edges.
- Give thickness as a measured range, not a single typical value.
- Identify leather type and any liner, coating, or backing.
- Ask whether makers approve this material combination.
- Test maximum-thickness samples before assortment approval.
Material qualification checks
| Sample condition | What to record |
|---|---|
| Thinnest material | Hole shape and edge stability |
| Thickest material | Effort, cut completion, and slug removal |
| Layered assembly | Alignment and separation between layers |
| Coated or backed stock | Finish damage and exit-side quality |
A combination pliers uses guide can help buyers plan a broader hand-tool assortment, while this page stays focused on hole-punch qualification.
5. What working reach and access do you need?
Correct diameter does not help if jaws cannot reach the hole location. Check throat depth, maximum opening, and workpiece shape. A strap, curved panel, or assembled bag may need access that a flat coupon cannot reveal.
Ask for model dimensions, not just overall length. Handle length does not indicate how far material reaches between punch and pivot. Test holes near folds, seams, edges, or hardware. Confirm head clearance and square anvil contact.
Use a production part as a fit gauge. Drawings help, while samples reveal folds, stiffness, and awkward approach angles.
- Measure edge distance and required reach.
- Check jaw opening against compressed material thickness.
- Confirm head clearance around seams and hardware.
- Trial both flat coupons and representative finished parts.
Access checks for real workpieces
| Access check | Evidence to request or test |
|---|---|
| Throat depth | Supplier dimension or physical measurement |
| Jaw opening | Maximum opening under model documentation |
| Edge proximity | Sample punch at actual hole position |
| Head clearance | Rotation and alignment on finished geometry |
Buyers comparing families can review round nose vs chain nose pliers for an example of how jaw shape and access affect task fit.
6. How do you check head alignment and hole quality?
On revolving tools, selected tubes must meet anvils in alignment. A loose index, worn pivot, or off-centre contact can shift a hole or distort its edge. For drive punches, check tube alignment against material during impact. Inspect both workpiece faces and remove punched slugs before judging cuts.
Run repeated samples at each required size. Look for round openings, clean edges, consistent location, and complete separation of the slug. Record the material, thickness, tube position, and operator method. A good sample on soft scrap does not prove performance on a thicker production material. Acceptance criteria should reflect the finished product, not an unsupported claim of “perfect” holes.
Inspect both sides closely. Tearing or raised burrs may appear underneath despite a clean-looking top face. Reject samples that need unplanned trimming or excessive force.
- Mark a repeatable hole location on each sample.
- Punch multiple pieces at every required tube size.
- Check entry and exit edges under consistent lighting.
- Record force complaints, incomplete cuts, and slug clearing.
Sample acceptance criteria
| Quality point | Pass evidence |
|---|---|
| Alignment | Hole centre stays on the marked location |
| Roundness | Opening matches agreed sample or gauge |
| Edge condition | No unacceptable tearing or crushing |
| Repeatability | Results remain consistent across trial pieces |
7. What should buyers inspect about construction and spares?
Check pivot play, handle attachment, and any return spring or lock. Rotate each tube position and check whether the head engages consistently. Look for clear size markings and a way to store the tool without damaging cutting edges. These checks help flag a sample concern; they do not establish steel grade, heat treatment, coating performance, or service life.
Replacement support varies by model. KNIPEX lists separately available punch tubes for its 90 70 220 revolving pliers, while C.S. Osborne’s catalog lists replacement tubes for its No. 223 model. Those examples demonstrate that spares exist for named products, not that all rotary tools accept interchangeable tubes. Ask for the exact part numbers, ordering method, and whether replacement requires a service procedure.
Document serviceability. If suppliers cannot confirm tube replacement, treat each tool as a complete unit pending written details.
- Check pivot movement and tube indexing on a sample.
- Confirm material and finish claims against model documentation.
- Request spare tube part numbers where the maker supports them.
- Clarify storage, cleaning, and replacement instructions.
Construction and spare-parts questions
| Component | Buyer question |
|---|---|
| Pivot and index | Does each position engage without visible wobble? |
| Punch tubes | Are individual replacements available for this model? |
| Spring or lock | What function does the feature serve and how is it maintained? |
| Markings and storage | Can size identity and safe storage be maintained? |
For distributor assortment context, see slip joint pliers vs combination pliers and the pliers wrench vs water pump pliers guide; each treats model variation as a specification issue.
8. How should you assess production volume and operator effort?
A hand tool used for occasional repairs faces a different workload from one used for repeated punching throughout a shift. Count holes per operator, size changes, workpiece handling time, and breaks between batches. Ask workers to trial the proposed punch with realistic material and a normal grip. A tool that feels acceptable for five holes may become tiring during repetitive work.
Revolving models reduce the need to change separate punches when a job uses several sizes. That convenience does not guarantee faster output; positioning, slug clearing, tool reach, and operator familiarity also affect cycle time. Where volume is high, evaluate whether a bench or powered process better suits the line, while confirming available equipment and safety needs independently. Do not infer a production rate from a product photograph or a short demonstration.
Measure a representative work cycle. Record completed parts, rejected holes, size changes, and operator feedback during a controlled trial. Compare tools on the same part and material.
- Estimate holes per shift and size distribution.
- Trial the tool across a normal batch, not a single squeeze.
- Record fatigue, missed marks, and slug-clearing interruptions.
- Review whether a different process is needed at sustained volume.
Workload fit by operating pattern
| Work pattern | Trial emphasis |
|---|---|
| Occasional service use | Portability, simple selection, storage |
| Mixed-size batch work | Indexing, clear size identification, change time |
| Repetitive production | Cycle consistency, effort, reject tracking |
| High sustained volume | Compare hand tool with suitable production methods |
A broader needle nose pliers uses guide may support adjacent assortment planning, while effort and cycle-time claims for this punch should come from your own trial.
9. How do you build a useful assortment and packaging brief?
Build a size assortment from actual product drawings, hardware, repair history, and customer demand. Do not copy the six sizes shown on another brand’s package or assume a six-position head always contains identical diameters. One product example cannot establish another model’s contents.
For retail programs, list included tubes, setting plier, eyelets or grommets, instruction language, package dimensions, barcode, and market labels. Separate confirmed contents from requested options. If a kit combines punch and setter, explain both functions in product information. Ask for packaging artwork and a physical sample where presentation or labeling affects approval.
Let sales data set the mix. Start with required sizes and add optional positions only when customer demand justifies them. Keep approved bill of materials with its sample record.
- Map each tube size to a buyer application.
- Define whether a set includes spare tubes or setting dies.
- Specify retail, bulk, or private-label packaging requirements.
- Confirm every printed specification against the approved sample.
Assortment fields for the supplier brief
| Assortment field | Example of buyer instruction |
|---|---|
| Required sizes | List exact diameters and units |
| Kit contents | Name punch, tubes, setter, and accessories separately |
| Packaging | State language, label, barcode, and pack format |
| Approval record | Tie approved sample and artwork to revision number |
For broader sourcing support, the China OEM auto tools supplier guide outlines supplier-information practices; apply the same discipline without assuming any particular factory capability.
10. What should go into your RFQ and final approval?
A strong RFQ lets suppliers assess a real application. Include material samples, thickness range, hole diameters and locations, quantity, packaging, sales market, and sample availability. Add drawings or photos with scale where they clarify access. Define hole shape and fit acceptance. Ask which technical claims suppliers can document for each model.
Request model dimensions, tube sizes, material limits, replacement availability, and sample timing. Confirm price, MOQ, certifications, capacity, and delivery in writing. Do not infer details from photos, generic catalogs, or another supplier. Keep approved sample, artwork, and specification revision together before ordering.
Send samples and acceptance criteria with your inquiry. This gives both sides a clear basis for selection and approval.
- Product and intended hole function
- Leather type, thickness range, layers, and physical sample availability
- Required diameters, location, tolerance, and mating hardware
- Quantity, packaging, target market, and language needs
- Sample approval criteria and request for documented model limits
Request a quote for your application. Contact our team with leather samples, thickness range, hole diameters and locations, order quantity, target market, packaging needs, and sample availability.
FAQs
Q1: Can a revolving leather punch handle thick leather?
That depends on the exact model, leather, and number of layers. Check maker instructions and trial the thickest intended sample before approval.
Q2: Are all six holes on a revolving punch the same sizes?
No universal size sequence applies. Confirm exact model diameters; manufacturer examples show different six-size combinations.
Q3: Can a leather hole punch cut metal?
Do not assume so. The cited revolving models are described for leather and other soft materials. Use only materials approved by the tool maker.
Q4: Is a rotary punch the same as an eyelet setter?
No. A punch cuts an opening; a setter deforms an eyelet or grommet through a prepared hole. Some kits include both tools.
Q5: What information should I send a supplier?
Send material samples, thickness, hole sizes and locations, quantity, packaging, market, and sample availability. Add acceptance criteria and ask for model-specific limits.
Looking for a reliable mechanic tools manufacturer in China?
If you are sourcing hand tools, socket tools, automotive repair tools, mechanic tool sets or OEM private label tools, contact KOLARWIN Tools for factory-direct quotation, customization support and product consultation.