Need OEM supplier support for this product type?
Contact KOLARWIN Tools for OEM mechanic tools, private label packaging, wholesale quotation and product range support. This gives overseas buyers a clear path from article reading to supplier discussion.
This guide covers bench filing on stationary parts only. It explains setup, grip, pressure, measurement, cleaning, stop criteria, and buyer requirements, using manufacturer and workplace safety guidance as reference points. For a training document, adapt each step to the workpiece material, plant risk assessment, and equipment maker’s instructions.
1. What is a hand file used for in bench work?
A hand file is a manually guided cutting tool for removing modest amounts of material. At a bench, a technician may use one to smooth a sawn edge, remove a burr, adjust a fit, blend a small high spot, or refine a shape. For stock separation before filing, see the guide to using a hacksaw.
Files also differ in shape, cut, length, and grade. Match those features to the surface and material; a coarse double-cut flat file and a fine single-cut mill file do not behave alike. This guide focuses on how to handle the tool after selection. For profile and cut choices, see the companion guide to hand file types.
- Work only on a part secured against movement.
- Identify the surface or edge needing correction.
- Set a measurable stop point before filing.
Start with a controlled target. Use a file for a small, observable correction, then measure before removing more material.
Job and control objective
| Bench task | File’s role | Control check |
|---|---|---|
| Remove a light burr | Break a sharp raised edge | Avoid rounding the adjoining face |
| Fit a flat edge | Remove a small high spot | Check against drawing or mating part |
| Smooth a cut surface | Refine texture and edge | Inspect finish and remaining dimension |
2. How should the workpiece and bench be set up?
Secure the workpiece in a vise or approved fixture before the file touches it. The part should resist filing force without rocking, twisting, or slipping. Position the target surface where the file can travel through a clear, controlled stroke. Keep enough room for your hands and the tool; a cramped stance often leads to uneven pressure or a file path aimed toward the body.
Protect finished surfaces with suitable jaw covers or soft inserts when clamping could mark or deform the part. Choose a support point that prevents vibration without obstructing the area being filed. Nicholson’s guide suggests a vise around elbow height for normal work, with adjustments for heavier or delicate tasks. Treat that as a starting reference, then follow your site’s ergonomic practice and operator training.
- Clamp the part firmly without crushing thin sections.
- Expose the work area while supporting the rest of the part.
- Check file travel and hand clearance before beginning. Choose workholding suited to part geometry; the clamp types guide gives buyers a broader view of holding options.
Test the setup before cutting. Apply light hand force to the workpiece; if it shifts, improve the fixture or stop.
Setup check
| Check | Acceptable condition | Action if it fails |
|---|---|---|
| Workholding | Part stays fixed under hand pressure | Reposition or use an approved fixture |
| Surface protection | No avoidable vise marks or distortion | Add suitable jaw protection |
| Stroke space | File can travel without obstruction | Change position or method |
3. How should a file handle be fitted and held?
A file’s pointed tang can injure a hand if used bare. Fit a handle sized for the tang and file, then check that the handle seats firmly and has no splits, looseness, or damage. OSHA’s small-business safety checklist specifically calls for appropriate handles on files and similar tools. For a typical two-handed bench stroke, hold the handle in your dominant hand and support the file near its point with the other hand. Keep fingers clear of the workpiece edge and away from the cutting path.
- Seat the tang fully according to the handle instructions.
- Check handle security before every use.
- Use a grip that keeps fingers clear of edges and pinch points.
Handle fit is a safety check. Remove a file from service if its handle loosens, splits, or no longer holds the tang securely.
Handle inspection
| Feature | Check | Stop condition |
|---|---|---|
| Tang seating | Handle remains secure during a light hand check | Tang shifts or pulls free |
| Handle body | No crack, split, or crushed end | Damage affects grip or retention |
| Grip position | Both hands can guide the tool | Fingers enter pinch or cut path |
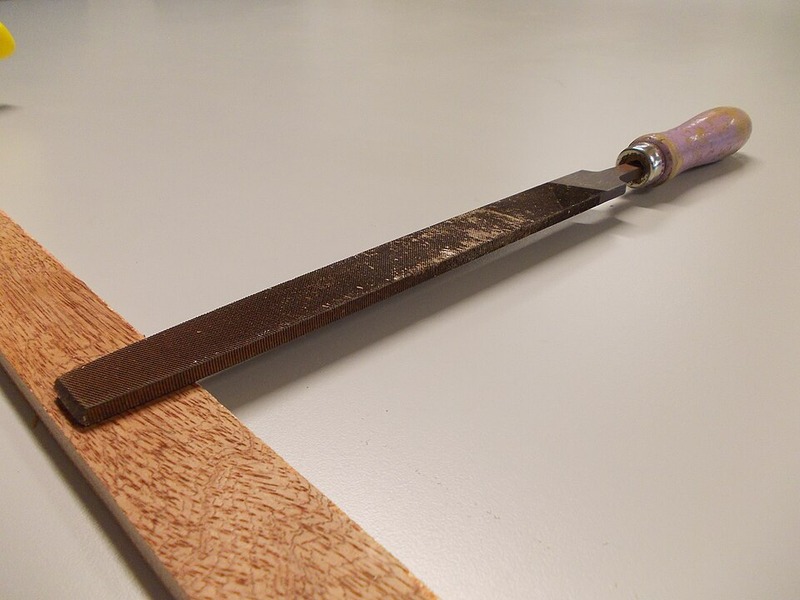
4. How do you make a controlled forward filing stroke?
Place the file flat against the target surface, with its long axis aligned to the intended path. Push it forward in a steady, straight or slightly diagonal line. Keep the blade in one plane instead of rocking from heel to point. Rocking can round a surface that should remain flat, especially near an edge.
For broad surfaces, a small lateral change between passes can distribute contact and reduce grooves. Avoid steering abruptly at the end of a stroke; ease off as the file reaches the edge so teeth do not dig into a corner. Nicholson describes conventional files as cutting on the forward stroke and recommends lifting clear on return, with an exception for very soft materials and only very light return pressure. Follow the specific file maker’s direction if its cut or application differs.
- Start with the file fully supported on the work.
- Maintain a stable angle and plane throughout the push.
- Ease off before the file runs past an edge.
Keep the motion boring and repeatable. A steady stroke makes both the surface and the operator’s feedback easier to judge.
Stroke checkpoints
| Stroke phase | Hand action | Surface control |
|---|---|---|
| Start | Set file square or at planned angle | Confirm full contact |
| Forward pass | Push smoothly in one plane | Avoid rocking or twisting |
| End and return | Ease pressure, then lift or lightly return as specified | Protect edge and teeth |
5. How much pressure should you apply?
Use enough pressure to keep the teeth cutting, not enough to force the file through resistance. Excessive force can load teeth, cause chatter, or make the blade rock. It can also hide a wrong file choice by turning a smooth process into a struggle.
If a file stops cutting cleanly, do not lean harder. Check whether filings are packed between the teeth, whether the file suits the material, and whether the workpiece remains secure. A skating sensation can point to a hardened surface or dull/worn teeth; a sudden bite may mean pressure or angle changed. Stop and inspect before continuing. On the return stroke, lift the file clear where the manufacturer recommends it. Nicholson allows only very light return pressure for very soft metals; that exception should not become a default habit.
- Increase pressure gradually only while the cut remains smooth.
- Keep pressure balanced across the blade.
- Stop when effort rises but material removal falls.
Let the file tell you when something changed. Recheck cleanliness, file condition, alignment, and material before applying more force.
Symptom and adjustment
| Symptom | Possible check | Response |
|---|---|---|
| File skates | Material hardness, tooth condition, angle | Stop and confirm tool suitability |
| Chatter or rocking | Pressure and workholding | Reduce force and stabilize setup |
| Teeth clog | Material and file cleanliness | Clean with an appropriate file card |
6. How do you file a surface flat and to a dimension?
Flatness comes from keeping the file supported and moving in a consistent plane. Before starting, identify the datum surface and the areas where material must remain. If the drawing provides dimensions or tolerances, use the specified measuring method; do not treat visual appearance as proof of size. Use the gauge specified for the geometry and tolerance, following calibration rules.
Make a few controlled passes, clear chips, and measure again. If the surface has a high spot, avoid concentrating every stroke there without checking surrounding contact. Small diagonal or crosswise changes in direction can help reveal uneven contact, but they do not replace an inspection method. Stop before crossing a tolerance limit or altering a datum unintentionally. If the part is near its limit, pass it to the designated inspector rather than trying to improve the finish by feel alone. For instrument selection, compare digital and dial calipers against the job’s measurement needs.
- Mark the target area and protected datum surfaces.
- File in short batches, then inspect the result.
- Use a suitable gauge at planned intervals.
Measure before the last pass. Near a tolerance boundary, remove less material per cycle and obtain inspection approval.
Progress check
| Stage | Inspection question | Record or action |
|---|---|---|
| Before filing | What dimension or surface controls acceptance? | Identify datum and gauge |
| During work | Is the file removing material evenly? | Reposition only within procedure |
| Near target | Is the dimension within allowable range? | Stop and request inspection if uncertain |
7. How do you reduce pinning and keep the file cutting?
Pinning occurs when small filings wedge between teeth. Packed chips reduce cutting action and can scratch the work. Inspect the file face during work, especially with softer or ductile materials that tend to load teeth. Use a file card or brush intended for file cleaning, moving it along the tooth pattern as its maker directs. Keep hands away from sharp teeth, and clear debris into an appropriate collection area rather than wiping the blade with bare fingers.
Clean when the file begins to skate, leaves scratches, or visibly holds packed material. Do not strike the file against a vise or another hard object to knock chips loose; impact can damage teeth or the file itself. Separate files by material and application where cross-contamination matters.
- Inspect teeth at intervals and whenever cutting changes.
- Clean with a file card or brush designed for that purpose.
- Store files so cutting surfaces do not collide or collect debris.
Cleanliness protects the finish.
Maintenance response
| Condition | Response | Avoid |
|---|---|---|
| Visible packed chips | Clean with suitable file card/brush | Bare-hand wiping |
| Scratching or uneven cut | Inspect teeth and workpiece debris | Forcing the stroke |
| File stored with other tools | Separate or protect cutting faces | Tooth-to-tooth contact |
8. When should you stop and change the method or tool?
Stop if the file skates repeatedly, binds, chatters, or produces an unexpected surface. Also stop if the workpiece moves, the handle loosens, the blade chips, or the operator cannot keep hands clear. These signs call for a setup or tool review, not a harder push. Confirm the material, surface condition, file grade, geometry, and inspection requirement. If these do not explain the problem, ask a supervisor or process engineer before continuing. If the job calls for impact-driven cutting or chipping rather than finishing, compare cold chisels and wood chisels before changing tools.
This article covers bench work on a stationary, secured workpiece. Do not apply these instructions to a part turning in a lathe or to any moving machine. Nicholson discusses lathe filing separately, but this guide intentionally excludes it because machine-specific hazards and procedures require their own controls and training. Follow equipment procedures and site authorization for machine work.
- Stop if tool condition or workholding changes.
- Escalate unknown materials, coatings, or tolerance issues.
- Use a different approved process when filing no longer controls the result.
A stop is a process control. Record the issue and get the correct tool or instruction before restarting.
Stop criteria
| Stop signal | Immediate action | Restart basis |
|---|---|---|
| Part slips or rocks | Stop and secure it again | Stable fixture check |
| Handle or file is damaged | Remove tool from use | Approved replacement |
| Cut quality changes unexpectedly | Clean and inspect; verify file/material | Supervisor or procedure review |
9. What safety checks and training should a team use?
A short work instruction can standardize setup without pretending every part uses the same file. Include workholding, required handle, file identification, hand positions, stroke direction, cleaning method, measuring points, and stop conditions. Train operators on the specific workpiece and acceptance criteria. OSHA’s general safety handbook includes a checklist item for appropriate handles on files and similar tools, along with broader tool inspection and employee hazard-awareness checks. Place the file in a wider industrial maintenance tool plan and mechanic tool list. Follow your site’s risk assessment for eye protection and other personal protective equipment, since filings and workpiece conditions vary.
Keep files clean, identified, and in good condition. Inspect handles and cutting faces before use. Store tools so teeth are protected and the tang cannot injure someone reaching into a drawer. Confirm unclear file profiles before production use.
- Tie each file to an identified task or approved range of tasks.
- Train operators on workholding, hand placement, measuring, and stop rules.
- Document inspection and replacement criteria.
A simple checklist reduces guesswork. Put the approved setup and gauge points beside the workstation where filing occurs.
Work instruction checklist
| Work instruction field | Example entry | Owner to confirm |
|---|---|---|
| File and handle | Profile, cut, size, handle match | Tooling or engineering |
| Setup and PPE | Fixture, jaw protection, site PPE | Safety and supervisor |
| Inspection | Gauge, datum, interval, tolerance | Quality |
10. What should buyers specify when sourcing hand files?
A useful RFQ describes the job instead of asking for a generic “metal file.” State the workpiece material, target surface, profile, expected stock removal, finish requirement, dimensions, and whether the work is occasional maintenance or a controlled production task. Add the preferred file cut, length, tooth style, edge arrangement, and handle requirements. Ask the supplier to identify its grade convention, since labels such as bastard, second, or smooth can vary by maker and file length.
Request a current drawing or product data sheet, sample approval, packaging details, and any recommended file card or handle. Include workstation and inspection needs in the specification. Browse the hand tools category for broader context and send drawings or sourcing questions through Contact Us.
- Attach a drawing, sample surface, or clear application description.
- Confirm grade terminology, dimensions, and handle fit in writing.
- Approve a sample and work instruction before production rollout.
Make the approval traceable. Link the file part number, sample, operator instruction, and inspection method in one purchasing record.
FAQs
Q1: Should a hand file cut on the forward or return stroke?
Most conventional hand files cut on the forward stroke. Follow the file maker’s instructions; Nicholson permits only very light return pressure for some very soft materials.
Q2: Do I need a handle on a hand file?
Use an appropriate, securely fitted handle on a file with an exposed tang. Inspect it before work and replace a loose or damaged handle.
Q3: How do I keep a hand file from clogging?
Inspect the teeth and clean filings with a suitable file card or brush. Avoid bare-hand wiping and do not force a clogged file through the work.
Q4: Can I use a hand file on a part held in a lathe?
This guide covers stationary bench work only. Follow the lathe maker’s procedure and site training for any machine operation; do not apply bench-filing steps around moving machinery.
Q5: How can I check whether a filed surface remains flat?
Use the gauge, straightedge, or inspection fixture specified for the drawing and tolerance. Visual appearance alone does not verify flatness or size.
Looking for a reliable mechanic tools manufacturer in China?
If you are sourcing hand tools, socket tools, automotive repair tools, mechanic tool sets or OEM private label tools, contact KOLARWIN Tools for factory-direct quotation, customization support and product consultation.