Need OEM supplier support for this product type?
Contact KOLARWIN Tools for OEM mechanic tools, private label packaging, wholesale quotation and product range support. This gives overseas buyers a clear path from article reading to supplier discussion.
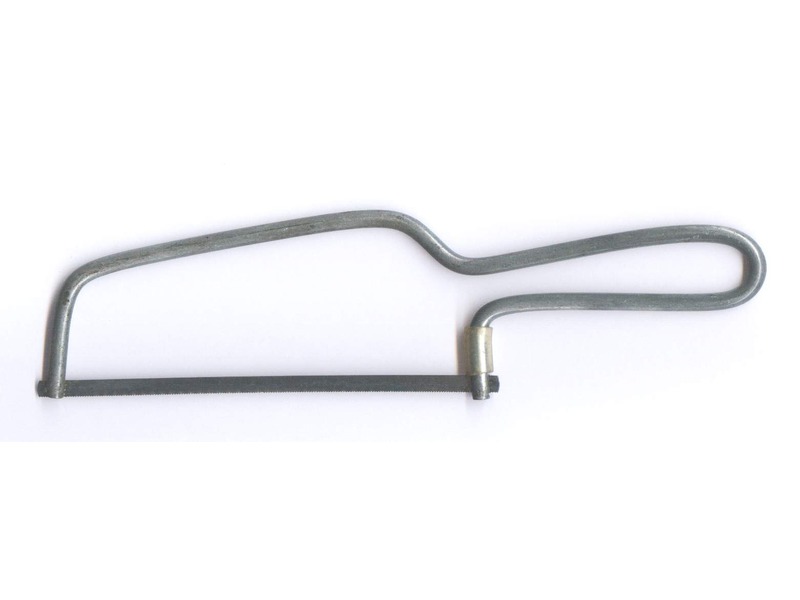
A hacksaw can cut metal stock cleanly, but a poor blade choice or loose workpiece can spoil the cut and damage teeth. Choose a documented blade and fit it according to frame instructions. Secure stock and set model-specific tension before a gentle, controlled start. Maintain alignment, support the offcut at breakthrough, then inspect edge and dimensions. Blade direction and tension vary by model, so follow its instructions.
1. What is a hacksaw designed to cut?
A hand hacksaw uses a narrow replaceable blade held in a frame. Its toothed edge removes material as operators move a frame through a controlled stroke. This guide focuses on hand hacksaws for metalworking and maintenance tasks. Blade and frame designs differ, and some saws allow alternate blade positions for access or flush cutting. Our types of hand saws guide covers broader saw families; this article focuses on setup and safe operation.
Before cutting, identify the workpiece material, section shape, thickness, cut location, and finish requirement. Confirm a hacksaw and selected blade suit that job. Do not infer material capacity from a frame’s appearance or from another model’s description. If material, blade recommendation, or work instruction remains unclear, pause and request a clear specification.
Start with work requirements, then select saw setup.
- Identify material and section dimensions.
- Confirm a hand hacksaw suits the task.
- Set a clear cut line and check nearby obstructions.
- Keep the applicable maker instructions available.
For training, ask each operator to identify the stock, cut line, and stop condition before setup.
Task definition
| Before setup | Confirm | Why it matters |
|---|---|---|
| Material | Workpiece description or drawing | Blade selection depends on job requirements |
| Section | Shape and thickness | Controls support and access planning |
| Cut | Location and finish requirement | Prevents cutting the wrong feature |
| Tool | Frame and blade suitability | Avoids assuming all hacksaws share one capacity |
2. How do you choose a suitable hacksaw blade?
Choose a blade listed by its maker for the material and cutting task. Check blade length, tooth form, teeth per inch (TPI), and frame compatibility. Do not choose TPI by habit alone. Fine and coarse pitches serve different work; selection depends on stock and maker guidance. Bahco, for example, offers hand hacksaw blades in several TPI options; that product range does not establish one universal selection for every material.
Inspect the package and blade for part identification, length, damage, corrosion, missing teeth, or distortion. A blade that appears bent, damaged, or incompatible should not go into the frame. Keep the blade type and intended material recorded for repeat jobs. For suitable short solid stock, compare bolt-cutter use before choosing between a saw and a shear; each tool has separate material limits.
Match blade details to the actual stock.
- Verify blade length and frame fit.
- Use maker guidance for material and TPI.
- Reject damaged, distorted, or unidentified blades.
- Keep replacement blades labeled by specification.
If two blade options remain plausible, consult the blade supplier before production rather than guessing from tooth appearance.
Blade selection fields
| Field | Verify | Avoid assuming |
|---|---|---|
| Length | Frame-compatible blade length | Every frame accepts one length |
| TPI | Maker guidance for stock and cut | One pitch suits every section |
| Tooth condition | Teeth intact and blade straight | Light damage will cut safely |
| Material | Blade maker’s stated application | Frame brand alone sets capacity |
3. How do you install and orient the blade?
Follow your frame’s instructions for releasing tension, fitting blade ends to pins or holders, and restoring tension. Check the frame design before removing a blade; mechanisms vary. Do not force a holder, twist a blade into place, or copy another model’s loading sequence. Some frames offer alternate mounting positions for a specific cut, such as flush access. Use those positions only when the frame maker identifies them for that purpose.
Cutting direction also depends on blade and frame configuration. On a conventional forward-cutting setup, the teeth point away from the handle and cut as you push. Confirm your frame’s instructions instead of assuming every model follows that arrangement. Inspect blade markings before fitting. Orient blade teeth as directed for that model; verify direction before bringing it to stock.
Make orientation a visible check, not a memory test.
- Check blade markings and frame instructions.
- Seat both ends fully in their holders.
- Confirm tooth direction before restoring tension.
- Stop if a pin, holder, or blade does not fit cleanly.
During a blade change, keep fingers away from sharp teeth and release stored tension as the maker directs.
Installation checks
| Check | Pass condition | Stop condition |
|---|---|---|
| Compatibility | Blade length and ends match frame | Holder or pin alignment is uncertain |
| Orientation | Teeth follow this model’s instructions | Direction cannot be confirmed |
| Seating | Both blade ends rest securely in holders | Blade shifts or sits crooked |
| Changeover | Tension released and restored as directed | Frame mechanism feels damaged |
4. How should you set blade tension?
Use this frame’s tension mechanism and follow its maker instructions. The required method and tension vary by design. Some frames use a threaded knob; others use a lever or quick tension system. Stop at the frame maker’s specified condition. Do not invent a tension value, count turns from another model, or keep tightening because a blade feels loose by hand.
Check blade alignment after tensioning. The blade should remain straight in its holders and should not bow or twist. If tension cannot be set or a holder slips, remove the frame from service and inspect for damage. High-tension frame claims apply to the named frame model only; they do not authorize a universal setting for other saws.
Set tension from instructions, then inspect alignment.
- Identify the frame’s tension control.
- Follow model-specific loading and tension steps.
- Check blade alignment after adjustment.
- Stop if blade or frame cannot hold its position.
Record frame model and blade specification in work instructions where multiple setups share a station.
Tension and alignment record
| Item | Check | Response |
|---|---|---|
| Tension control | Maker’s specified method | Set only within model instructions |
| Blade line | Straight and seated at both ends | Refit or remove from service |
| Frame | No visible bend or loose mechanism | Quarantine suspect equipment |
5. How do you secure the workpiece?
Support and secure stock before cutting. For metal bar, tube, or section work, use a suitable vise or fixture with enough contact to prevent movement. Place support near the cut without blocking blade travel. The correct fixture depends on workpiece shape and material; do not rely on hand pressure to restrain stock. Compare workholding options when selecting a fixture that suits the stock and cutting forces.
Mark the cut line clearly, then check full stroke path. Confirm stock remains supported near breakthrough. Thin sections may vibrate or deform if clamped poorly, while a long overhang can shift or pinch the blade. Keep hands outside the blade path and away from pinch points.
A steady workpiece makes a steadier cut.
- Clamp stock firmly without distorting it.
- Support long sections near the work area.
- Keep the marked cut line visible.
- Check blade clearance through the full stroke.
Before starting, try the planned stroke without cutting. Correct any clash with the vise, bench, or neighboring parts.
Workholding review
| Workpiece condition | Check | Adjustment |
|---|---|---|
| Long stock | Support beyond vise or fixture | Add suitable support without blocking stroke |
| Thin section | Clamp pressure and vibration | Prevent crushing while limiting movement |
| Restricted cut | Full blade and frame clearance | Reposition stock or fixture before cutting |
6. How do you begin a straight cut?
Place a blade at the marked cut with frame controlled and stock secure. Begin with a light, deliberate starting stroke. Let the teeth establish a track before increasing stroke length. Do not force the frame sideways to correct a poor start. Stop, inspect, and reposition if cut begins wandering. A blade that twists or binds may be damaged or mismatched to the stock.
Keep the frame aligned with its intended cut plane. Let the blade cut; avoid leaning hard on handle. The blade’s cutting action can differ by direction and design, so follow its instructions and avoid assuming every saw’s working stroke behaves identically. Wear suitable eye protection for the material and shop procedure.
A calm start gives the blade a clean path.
- Align blade and cut mark before starting.
- Use a light initial stroke.
- Keep the frame in the intended cut plane.
- Stop if the blade slips or begins to twist.
For repeated cuts, use a setup sample to confirm starting position and clearance before processing production stock.
Starting the cut
| Observation | Response |
|---|---|
| Blade tracks the mark | Continue with controlled strokes |
| Blade slips off the line | Stop and reset position |
| Blade twists or binds | Stop, inspect blade, stock, and alignment |
7. How do you use controlled cutting strokes?
With that forward-cutting setup, use controlled pressure on the push stroke and release cutting pressure on the return stroke. Use long, steady strokes where clearance permits, keeping the frame in the cut plane; follow the maker’s instructions for any different blade configuration. Do not jerk, twist, or lever the frame. Grip designated areas and stand clear of moving blade path.
Stroke length depends on access and frame geometry. Shorter strokes may suit restricted access, but they still need controlled alignment. Keep the blade from rubbing sideways against kerf. If cutting slows, inspect blade condition and setup rather than adding uncontrolled pressure. For a broader maintenance assortment, industrial maintenance repair tools can support category planning beyond this saw operation.
Steady alignment beats extra force.
- Keep the blade straight in the cut.
- Maintain a controlled stroke suited to access.
- Keep fingers clear of the blade and frame pinch points.
- Pause if cutting action changes unexpectedly.
Train operators to stop and check setup when the cut binds, wanders, or produces an unusual sound or feel.
Stroke-control signs
| Condition | Better response | Avoid |
|---|---|---|
| Smooth cutting action | Continue with steady alignment | Sudden pressure changes |
| Kerf binds | Stop and inspect stock and blade | Twisting the frame to free it |
| Cut wanders | Pause and correct alignment | Forcing a sideways correction |
8. How do you finish the cut safely?
As the blade approaches breakthrough, reduce force and support separated stock. An unsupported offcut may drop or pinch the blade, damaging work or causing injury. Keep fingers clear of the kerf and do not reach beneath unsupported stock. Finish carefully, then withdraw the blade without levering sideways.
After cutting, inspect the edge and remove burrs using a method suited to workpiece material and drawing. Do not use the hacksaw blade as a scraper or pry tool. Check the workpiece against its size and finish requirements. If a production cut is out of tolerance, segregate it for disposition rather than hiding the error with extra filing.
Support the offcut before breakthrough.
- Reduce pressure near completion.
- Keep the offcut supported.
- Withdraw the blade without twisting.
- Inspect dimensions and edge condition.
For maintenance buyers, mechanic tools list can help place cutting and finishing tools within a wider service kit.
End-of-cut checks
| Check | What to confirm | Action if it fails |
|---|---|---|
| Offcut | Supported through separation | Stop and reposition support |
| Blade | No twist, damage, or missing teeth | Remove suspect blade from service |
| Workpiece | Size and edge meet drawing | Segregate and follow disposition process |
9. How do you inspect, clean, and store a hacksaw?
After use, remove chips safely and follow frame and blade maker’s care instructions. Do not wipe across teeth with bare fingers. Store blades so teeth are protected and specifications remain readable. Keep frames dry and inspect tension mechanisms, pins, handles, and frames for looseness, corrosion, cracks, or bending.
Replace blades that are dull, damaged, distorted, or missing teeth. Do not keep a suspect blade in a shared drawer where another operator might select it. Return usable blades to labeled storage and record frame or blade issues through the shop’s maintenance process. When stocking a saw inside a larger maintenance kit, include blade guards and replacement blades in the packing list. The mechanic tool set guide for distributors provides broader set-planning context.
A clean tool is easier to inspect before the next job.
- Clean and store according to maker instructions.
- Protect teeth and preserve blade identification.
- Inspect the frame, holders, pins, and tension control.
- Remove suspect blades and frames from service.
At shift change, return each tool to its assigned place and report any damage before work resumes.
Care record
| Component | Inspection point | Action |
|---|---|---|
| Blade | Teeth, straightness, identification | Replace or store in protected location |
| Frame | Cracks, bend, corrosion, loose parts | Quarantine if condition is uncertain |
| Tensioner | Operation and ability to retain blade | Follow maker service guidance |
10. What should buyers specify when sourcing hacksaws?
An RFQ should name the intended work, material range, frame style, blade length, blade compatibility, replacement blade options, packaging, and documentation. Ask suppliers to identify which blade configurations suit the stated task and provide model-specific mounting and tension instructions. Request a sample for operator review when the workflow or packaging is new. Agree on fit, labeling, inspection records, and acceptance criteria before approving a range.
Avoid unsupported universal claims about cutting capacity, blade life, or tension. A frame’s stated feature belongs to its documented model. Keep blade instructions with each item and make replacement identification clear for distributors and service teams. For broader buyer planning, the hand tool kit guide is a separate assortment resource. Product and sourcing questions can go through Contact Us.
A specific RFQ makes sample review practical.
- Describe material, section, and cut requirements.
- State frame and blade compatibility needs.
- Request instructions and clear replacement identification.
- Define sample review and acceptance criteria.
Have the end user confirm setup against an approved work instruction before release.
Q1: Which way should hacksaw teeth face?
In a conventional forward-cutting setup, teeth point away from the handle and cut on the push stroke. Follow the blade and frame maker’s instructions for a different configuration.
Q2: How tight should a hacksaw blade be?
Use the frame maker’s method and specified condition. Do not copy a tension value or turn count from another frame.
Q3: How do I choose TPI for a hacksaw blade?
Use blade-maker selection guidance for the stock and task. Do not assume one TPI fits all materials or sections.
Q4: Should I push hard while cutting?
Use controlled cutting pressure on the push stroke and release cutting pressure on the return stroke for a conventional forward-cutting setup. Stop if the blade binds, twists, or loses its track.
Q5: How can I avoid a rough or wandering cut?
Secure stock, begin gently, maintain alignment, and inspect blade if cutting action changes.
Looking for a reliable mechanic tools manufacturer in China?
If you are sourcing hand tools, socket tools, automotive repair tools, mechanic tool sets or OEM private label tools, contact KOLARWIN Tools for factory-direct quotation, customization support and product consultation.